


|
Outbound Reception Schedule Detail
In the Outbound Reception Schedule Detail screen, you can view or modify the details of a reception schedule or a transport schedules. The customer creates the schedules.
Schedule Type “Reception Days”
A schedule of the Reception Days type specifies the weekdays when the customer can receive goods. If the schedule type is Reception Days, the detail screen looks as below.
Schedule Id – the ID of the schedule is decided by the customer.
Last Updated – the date and time the schedule was last modified.
Schedule Type – you can change the schedule type to Transport Times.
Reception Days – the days that are checked are the days when the customer can receive goods.
Schedule Type “Transport Times”
A schedule of the Transport Times type is a transport schedule. You specify weekly and extra shipments, and based on these, PipeChain Supply schedules actual shipments on specific dates. If the schedule type is Transport Times, the detail screen looks as below.
Schedule Id – the ID of the schedule is decided by the customer.
Last Updated – the date and time the schedule was last modified.
Schedule Type – you can change the schedule type to Reception Days.
Select the Information to View – with this drop-down menu, you can choose what information to view and/or modify:
· Weekly Transports: A weekly schedule (weekday and time). You can schedule new weekly transports or remove existing ones.
· Cancelled Transports: A list of weekly transports that have been cancelled. You can cancel single occurrences of weekly transports here.
· Extra Transports: A list of extra transports (one-time additions to the weekly schedule). You can schedule new extra transports or remove existing ones.
· Transport List: A schedule of transports (with specific dates and times). This list is created automatically, based on the weekly, extra and cancelled transports that have been entered.
· All: All of the above.
Transport List – this list is created automatically (at regular intervals), based on the weekly, extra and cancelled transports that have been entered. You cannot edit it. To cancel a shipment, use the link under the Cancelled Transports list.
Cancelled Transports – this part of the screen lists cancelled transports. To cancel a transport, click on the link at the bottom of the list of transports. The following screen appears:
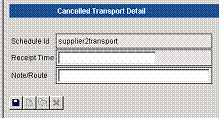
Figure: The Cancelled Transport Detail
screen
Enter the receipt time of the transport you want to cancel (you can copy and paste it from the Transport List) and add a note if you wish. Save by clicking on the diskette icon.
The transport will not disappear immediately from the Transport List – this will happen when the customer runs a specific server job (usually once a night).
To “un-cancel” a transport, click on the number next to that transport in the Cancelled Transports list. In the detail screen, click on the delete (red X) icon.
Extra Transports – this part of the screen lists extra scheduled transports. To schedule an extra transport, click on the link at the bottom of the list of extra transports. The following screen appears:
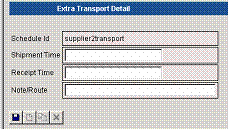
Figure: The Extra Transport Detail
screen
Enter the shipment and receipt times of the transport and add a note if you wish. Save by clicking on the diskette icon.
The transport will not appear immediately in the Transport List – this will happen when the customer runs a specific server job (usually once a night).
To delete an extra transport, click on the number next to that transport in the Extra Transports list. In the detail screen, click on the delete (red X) icon.
Weekly Transports – this part of the screen lists scheduled weekly transports. To schedule a weekly transport, click on the link at the bottom of the list of weekly transports. The following screen appears:
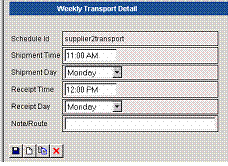
Figure: The Weekly Transport Detail
screen
Enter the shipment and receipt times as well as the weekday(s) of the transport and add a note if you wish. Save by clicking on the diskette icon.
Occurrences of the weekly transport will appear in the Transport when the customer runs a specific server job (usually once a night).
To delete a weekly transport permanently, click on the number next to that transport in the Extra Transports list. In the detail screen, click on the delete (red X) icon.
To cancel one occurrence of a weekly transport, use Cancelled Transports (see above).