


|
Connect to an OLAP Data Source
Regardless of what front-end tool you use, there are two ways to connect to an OLAP data source: either directly to one of the OLAP cubes in the OLAP database, or to a “cube file” – an exact copy in file format of an OLAP cube.
The advantage of a cube file is that it is easier to distribute to users, who can perform analyses and create reports without being hooked up to Microsoft SQL Server 2005/2008 Analysis Services. The advantage of an OLAP data source is that it is regularly updated with new data.
Any front-end tool that supports Microsoft’s OLAP technology can be used to connect to the PipeChain Analyzer OLAP data source. In this guide, we have chosen to use Microsoft Excel, because of its widespread use.
Connect to an OLAP Data Source (applies to Microsoft Office Excel 2007 and newer versions)
Begin by opening Microsoft Excel.
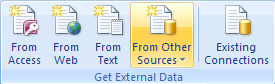
In the Data tab, in the Get External Data group, click the drop-down list From Other Sources and select From Analysis Services
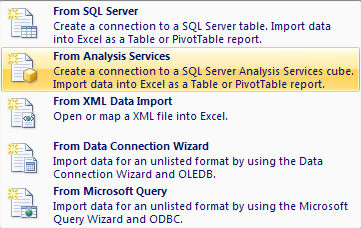
This will start up the Data Connection Wizard:
-
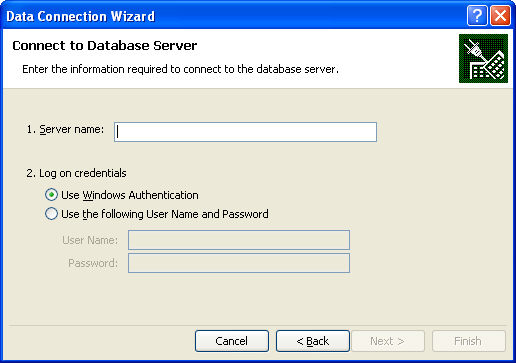
Connect to Database Server
-
type the name of the SQL Server computer in the Server name box
-
log on credentials; do one of following:
-
To use your current Microsoft Windows user name and password, click Use Windows Authentication
-
To enter a database user name and password, click Use the following User Name and Password, and then type your user name and password in the corresponding User Name and Password boxes
-
Select Database and Table
-
Under Select the database that contains the data you want, select PipeChain Analyzer
-
Under Connect to a specific cube or table, select the cube you want to analyze
-
Save Data Connection File and Finish
-
Optionally, revise the suggested file name in the File Name box.
-
Optionally, browse to change the default file location (My Data Sources).
-
Optionally, type a description of the file in the Description box.
-
To ensure that the connection file is always used when the data is updated, click the Always attempt to use this file to refresh this data check box. This check box ensures that updates to the connection file will always be used by all workbooks that use that connection file.
-
Click Finish to close the Data Connection Wizard.
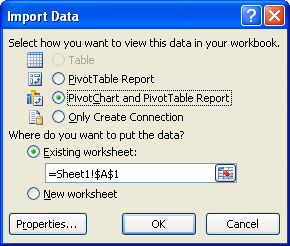
The Import Data dialog box is displayed:
-
Under Select how you want to view this data in your workbook, select PivotChart and PivotTable Report
-
Under Where do you want to put the data?, do one of the following:
-
To place the data in an existing worksheet, select Existing worksheet, and then type the name of the first cell in the range of cells where you want to locate the data.
-
To place the data in a new worksheet starting at cell A1, click New worksheet.
-
Click OK
You have now created a connection between the cube file and the front-end tool. You can now begin analyzing the data in the cube.
If you create / save a file with connections to the cubes you usually work with as a templets you don't have to redo these when you want to create a new report.
Connect to an OLAP Data Source (applies to Microsoft Office Excel 2003)
Begin by opening Microsoft Excel.
Click on the Data menu and choose PivotTable and PivotChart Report.
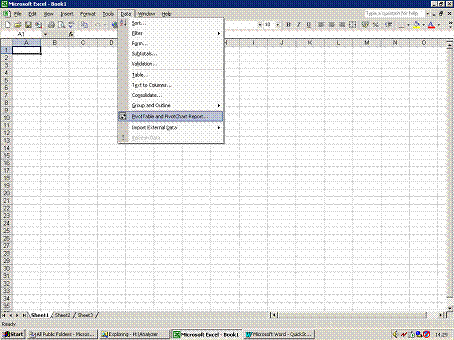
This opens a dialog box (see below).
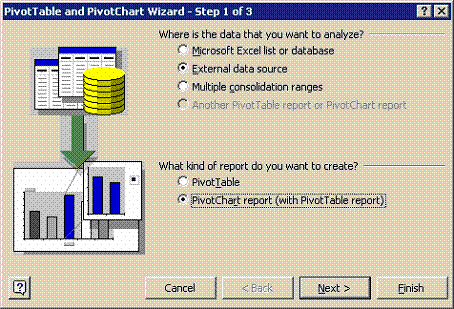
Where is the data that you want to analyze?
Select External data source.
What kind of report do you want to create?
Select PivotChart report (with PivotTable report).
Click on the Next button to move on.
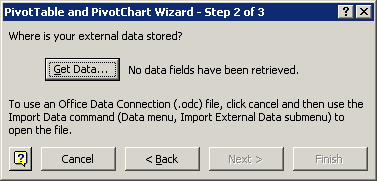
Since we have chosen to connect to an external data source, we have to specify how the data will be retrieved, and from where.
Click on the Get Data… button.
Now we have to create a link to the data source that we are going to use.
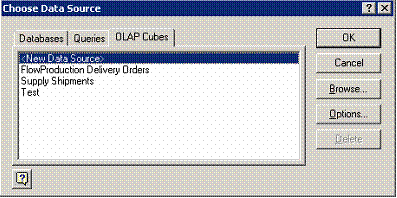
Select the OLAP Cubes tab. To create a new link to a data source, select <New Data Source> and click on the OK button.
Note If you have already created the data source link previously, just select it in the list and click on OK.
The following dialog box is shown:
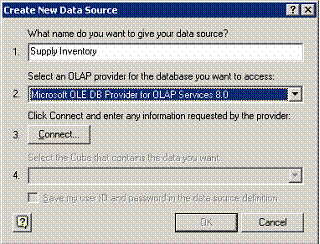
1. What name do you want to give your data source?
You can choose any name you want, but of course a descriptive name is preferable (for instance, the name of the OLAP cube). You can change the name after you have selected a cube before you click OK.
2. Select an OLAP provider for the database you want to access:
Select Microsoft OLE DB Provider for OLAP Services 8.0.
3. To specify how you want to connect to the data source, click on the Connect button.
When you click on the Connect button, the following dialog window opens. In it, you will choose how to connect to the data source.
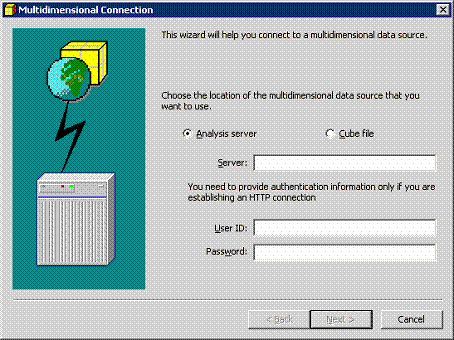
Select one of the options Analysis server or Cube file.
1. Analysis server: You connect to an Analysis Server where the OLAP cube is located. This may be either on your network, or over the Internet[3]. If you are connecting across the Internet, you also need to provide authentication information (User ID and Password) in the dialog window.
2. Cube file: A cube file is an exact copy of an OLAP cube in the OLAP database, but in file format, located either on your network or on your own computer. You can connect to a cube file even when you are not connected to the Analysis Server.
Connecting to an Analysis Server
If you select Analysis server, the dialog window will look as below:
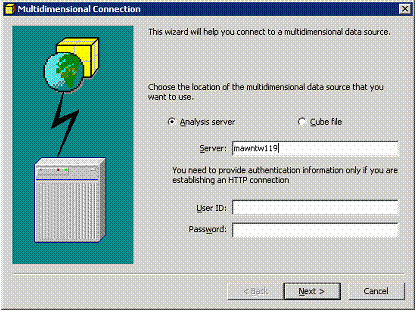
In the Server field, write the name of the server where the Analysis Server is installed.
If you are accessing the server with a HTTP connection (for example, if you are accessing the server over the Internet), you also need to fill out the User ID and Password fields.’
Click on the Next button.
The following screen is displayed next:
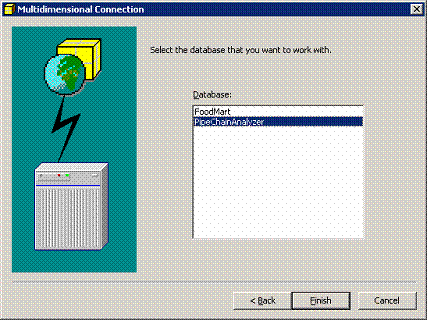
Select the PipeChain Analyzer OLAP database called PipeChainAnalyzer.
Click on the Finish button.
This brings you back to the Create New Data Source dialog window.
In field 4, you use the drop-down menu to Select the Cube that contains the data you want.
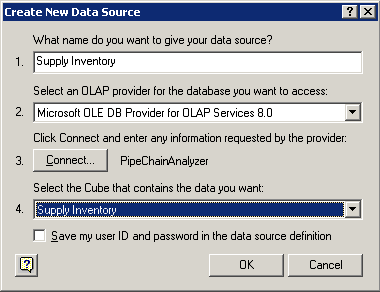
Click on the OK button to continue.
This brings you back to the Choose Data Source dialog window.
Connecting to a Cube File
If you select Cube file, the dialog window will look as below:
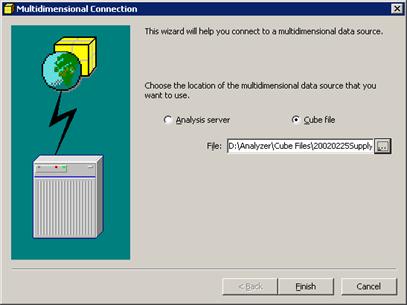
In the File field, write the path to the file. Or click on the button marked “…” to the right of the field to browse your computer or the network in order to find the file. PipeChain Analyzer cube files have the file suffix “.cub”.
When you have chosen the cube file (or written the search path), click on the Finish button.
This brings you back to the Create New Data Source dialog window.
You can now see that field 4 (Select the Cube that contains the data you want) contains the name of the cube we chose to work on.
Click on the OK button to continue.
This brings you back to the Choose Data Source dialog window.
The name of the cube we want to work with is now visible in the list (see below). It should be highlighted. If it is not, highlight the name of the data source you want to work with.
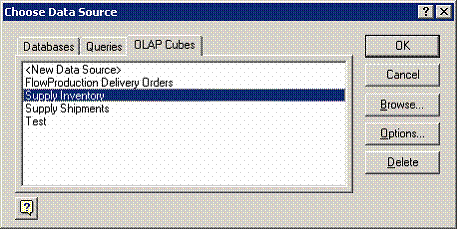
Click on the OK button.
This brings you back to this window:

You have now specified what data source you will work with. Now you have to specify how it should be displayed in the Microsoft Excel spreadsheet.
Click on the Next button to go on to step 3.
In step 3, the following dialog box opens:
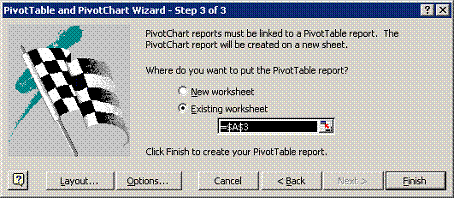
Choose Existing worksheet.
Click on the Finish button.
You have created a connection between the cube file and the front-end tool. You can now begin analyzing the data in the cube.
If you create / save a file with connections to the cubes you usually work with as a templets you don't have to redo these when you want to create a new report.