


|
Customer Detail
The Customer Detail screen contains the information about a particular customer.
Customer Id / Address – The id together with the address is what identifies the customer in PipeChain. They can consist of numbers and/or letters and must be entered when the customer is created. Once the customer has been created and saved, they cannot be changed.
Job for Suggestions is... – The status for suggestion generation. It can be Not Running, Pending, Starting and Running. When Running the field will have a rectangle "bouncing" back and forth.
Customer Name - The name of the customer.
Description – This field can contain comments about the customer. It can be something that relates to the customer or to the way the customer is handled in your own operations
Customer (type) Once the customer has been created and saved, the Customer Type cannot be changed. You can choose between:
Has PipeChain Supply - The customer has a full installation of PipeChain.
Has Web Access to This PipeChain Supply - The customer uses WebAccess to connect to PipeChain.
Public Webshop Customer - The customer uses the Webshop to connect to PipeChain.
Tabs
In the Contact Info tab, you can enter information of the customer such as Address, Vat no, customer’s time zone and define a contact user name.
The Calendar tab contains the calendar of this customer – non-working days and business hours.
The information is entered by the customer and sent to you via data exchange if the customer has PipeChain. You can modify the customer’s calendar yourself, but the next time the customer makes changes to it and does a data exchange, your changes will be overwritten. You should arrange with the customer that it is always either you or the customer who makes changes to the customer’s calendar.
Note A customer that only has WebAccess does not have access to the calender, which is why the supplier/you must update this customer’s calendar manually.
For more information on the calendar see The Calendar Detail.
PipeChain Version - The version of PipeChain your Customer is using - if the Customer have their own PipeChain Supply. Otherwise it says 0.0.0.0.0
- Authentication -
Demand authentication for customer data exchanges – if you check this checkbox, data exchanges with this customer will be stopped if authentication fails. The rest of the fields in this tab are enabled if this checkbox is checked.
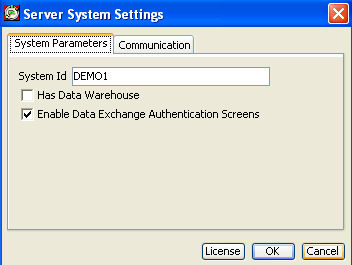
You choose whether you will demand authentication from customers when data exchanges are made. The Authentication fields are active only if you have chosen to use authentication. To do this, click on the View menu at the top of the PipeChain Supply screen. Select Server System Setting. In the dialog box that opens as a result of this, click on the System Parameters tab. Check the checkbox entitled Enable Data Exchange Authentication Screens. Click OK.
Example
 .
.
Customer Public Key Digest – this field contains a “fingerprint” of the authentication key that is being used. This “fingerprint” helps you check whether you and the customer are using the same public key.
If a data exchange does not work, and you suspect that the reason is that you and the customer have different public keys, you should contact the customer and make sure that you have the same keys. The Public Key Digest field in the Security Settings screen in the customer’s PipeChain Supply and the Customer Public Key Digest field in your PipeChain Supply should show the same value. If the values are not the same, you and the customer are not using the same public key, and the customer needs to send you the file containing their public key. You then need to import this file using the Import Customer Public Key button (3).
Import Customer Public Key – you click this button to import the customer’s public authentication key. This is a file that you should receive from the customer. When you click the button, you open a Windows dialog box where you can choose what file to import. After this, you have to save in order for PipeChain Supply to create a Customer Public Key Digest (2) is not created until you save!
Old customer key can be used for … days – in this field, you specify how many days the old key still works after the key has been changed. When the customer changes the authentication key, it may take some time before you receive the new key. During this time, the old key needs to be functional, or else no data exchanges will work.
-FlowModel And Calendar Handling, Production Plan Daily-
Use Outflow on Closed Days - If checked the Calendar is ignored for FlowModels of the type Production Plan Daily, i-e- demand on closed days are used in the demand calculation. If this is used it is important to place a zero-demand on the first of a series of days with no demand, including weekends and holidays. This is the recommended way to use PipeChain when the FlowModel is of the type Production Plan Daily. Unchecked is default for backward compatibility.
-Goods Receipt of Outbound Deliveries-
Update Customer Bucket Balance on Receipt - If checked (default), PipeChain will update the Customer Bucket Balance on receipt.
- Visibility of Delivery Suggestions in WebAccess And Customer Delivery Forecast-
Show Delivery Suggestions for the next ... workdays - If you want the delivery suggestions to be shown to your customer, check the checkbox and enter the number of days you want to be showed in the customer WebAccess..
Include All Products in Customer Delivery Forecast - If you want empty delivery forecast for products with no deliveries and no suggestions in the Delivery Forecast, check the check box
- WebShop-
Purchase Order Id required - Defines if the user must enter a Purchase Order Id (and Line Id) before confirming the basket or not.
User must accept conditions at check-out - Defines if the user must accept purchase conditions when confirming the basket or not.
This tab lists all the delivery agreements that you have on his customer.
You have one delivery agreement with the customer for each product or Product Variant.
If you double-click on an agreement, you open the Outbound Delivery Agreement Detail screen, where you can view and edit the details of that delivery agreement.
The column Status can have two different statuses except from OK:
Warning (yellow) - If the settings of the delivery agreement are somewhat inconsistent with the actual outflow, and the agreement needs looking into.
Error (red)) - If the settings of the delivery agreement are completely inconsistent with your actual outflow or self-contradictory, and the agreement needs to be modified. No suggestions are calculated for this product.
If you right-click on a row in the list of outbound delivery agreements, you open a menu where you can choose the following commands:
Sort By - Opens a submenu where you can choose how to sort the list items.
View - Opens a submenu where you can choose how to manage the view/columns and show all columns.
Export - Export the view to Html or to Excel.
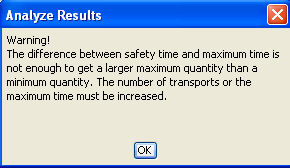
Analyze - If you choose this command, PipeChain Supply analyzes the agreement to see if the values are well adapted to the customer’s actual outflow etc. The result is shown in a dialog box as soon as the analysis is complete.
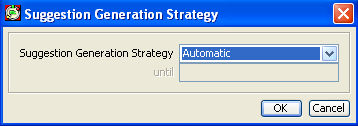
Suggestion Generation Strategy - Shows a dialog where the Suggestion Generation Strategy can be changed. You can choose between Automatic, Manual, Generation blocked, Generation and sending blocked or Monitoring.
Delete Suggestions - Delete all suggestions for this product for the current customer.
The Outbound Deliveries tab shows deliveries from you to this customers that you have announced (i.e. you have confirmed or shipped). If you double-click on any Outbound Delivery row, you open the Outbound Delivery Detail screen, where you can view the details of that delivery. See more information in Outbound Delivery Detail.
Note If you
need to delete an outbound delivery you should “cancel” it.
If you delete an outbound delivery, and a data exchange has already
been made after that outbound delivery was created, you have to inform
the customer so that they can delete the corresponding inbound delivery
in their PipeChain Supply.
The Shipment Time field turns yellow if the delivery has not been shipped yet and the shipment time is in the past.
The Receipt Time field turns yellow if the delivery has been shipped but not received, and the receipt time is in the past.
If you right-click on a row in the list of outbound deliveries , you open a menu where you can choose the following commands:
Sort By - Opens a submenu where you can choose how to sort the list items.
View - Opens a submenu where you can choose how to manage the view/columns and show all columns.
Export - Export the view to Html or to Excel.
Recalculate – if the status of the delivery is “Suggestion”, this command recalculates the shipment time and quantity for the delivery suggestion based on a new receipt time which you enter.
Generate Order – creates a Replenishment Order A VMI order generated by PipeChain. that includes the selected outbound delivery.
Confirm Delivery - Confirms the delivery suggestion.
Confirm Change - If the customer has changed the order (WebShop) the supplier can confirm the change if the order has status Changes Sent or Change.
Ship Delivery - Registers that the delivery has been shipped.
Cancel Delivery - Cancels the delivery before shipment.
Inventory Chart - Opens the Inventory Chart for this Customer / Product. Note that the current delivery's Receipt Time is "marked" in the Closing Inventory Chart with the date bold and in the Continuous Chart with a faded blue line.
Change Own Product - Opens a dialog where you can choose to deliver another own (replacement) product instead of the suggested product.
Allow Order Change - Defines if the order may be changed or not. It is used together with Send delivery suggestions = "Automatic Sending and Change".
* Delivery suggestion generation recalculates the deliveries in status Confirmed and sends order change. If you unchecked the Allow Changes status changes to Firm and the delivery will not recalculation.
The History Tab compares a plan on a date with x plans before and x plans after (x is configured in the bottom of the screen "+/- plans"). To display the comparison a product must be chosen and the Get Plan button must be clicked. The Plans displayed are both the Demand Plan (Flow Model or Flow Meter) ) and the Delivery Plan (suggestions and deliveries). The starting Date will be today minus the number of days in the "Initial Plan Offset".
Show Supplier - If there are one or more suppliers are supplying this product it is possible, by checking the check box "Show Supplier", to show the Supplier Demand Plan and Supplier Delivery Plan.
Y-Level - The interval between the plans compared can be day, week or month.
X-level - The data for the plans can be summed on daily, weekly or monthly level.
The Plans are saved every time a Delivery Forecast is sent out - or if the Delivery Forecast is not sent out, at the first suggestion generation process of each day.
SnapShot - The date and time when the Plan was saved.
Balance - Shows the current balance at specific SnapShot time.
Last R Balance - Shows the last reviewed balance at SnapShot time.
Tot Qty - The total quantity for all periods shown.
Periods - The quantity in the plan on the period date at the SnapShot time.
Zero values are not
shown.
All demand in past time is stored as backlog (red).
An increase in the plan from the previous day will be colored blue
and a decrease will be colored yellow.
If there is no data available the background will be a darker gray.
Screenshot
The Data Exchange tab lists the most recent data exchanges between this site and with the customer in question.
Each row shows information about the most recent data exchange of that type. There is one row for each type of data exchange (Normal Exchange, Total Exchange, Check Connection and Get Deliveries). Note that each type of data exchange is displayed here only after a data exchange of that type has been performed at least once.
If you double-click on one of the rows, you open the Customer Data Exchange Detail screen with information about that particular data exchange.
Data Exchange Type – each row represents one type of data exchange. There are four types of data exchanges: Total Exchange, Normal Exchange, Check Connection and Get Deliveries.
Data Exchange Result – this field shows the result status of the data exchange in question.
Note If the result status is Running when you access the screen, you need to refresh the screen to see the result of the data exchange.
Start Time – this field shows the time when the data exchange in question was started.
The Customer Buckets tab lists all the products (and product variants) with which you supply this customer.
If you double-click on one of the rows, you will open the Customer Bucket Detail screen, where you can view detailed information about the customer’s stock of that particular product. For explanations of the fields in this tab, see Customer Bucket Detail.
Some columns..
Duration – the Duration is the time left until the customer’s stock runs out. The colors have the same meanings as those of the Duration Meter.
Stock In Transit The cover time of the stock in transit of this product (i.e. confirmed and shipped deliveries). – the duration (see above) of the goods on their way to the customer (i.e. deliveries that have been confirmed). The colors have the same meanings as those of the Duration Meter.
If you right-click on a row in the list of outbound deliveries , you open a menu where you can choose the following commands:
Sort By - Opens a submenu where you can choose how to sort the list items.
View - Opens a submenu where you can choose how to manage the view/columns and show all columns.
Export - Export the view to Html or to Excel.
Recalculate Duration - If you use this command, PipeChain Supply will show the precise duration of this customer bucket as of this moment. The duration is always recalculated automatically at night.
Generate Delivery Suggestion - If you choose this command, a new delivery suggestion will be created for this product and customer, and the Outbound Delivery Suggestion Detail screen will be opened.
Inventory Chart - Opens the Inventory Chart for this Customer / Product. Note that the current delivery's Receipt Time is "marked" in the Closing Inventory Chart with the date bold and in the Continuous Chart with a faded blue line. See more information in Inventory Chart screen.
In the Groups tab the customer can be added to various customer groups. If you usually work with just a limited group of customers, you can add those customers to the same group and then set the filter to show only customers who belong to that group.
The left-hand field shows a list of all existing customer groups where the customer is not a member. The right-hand field shows all the groups where the customer is a member.
Add the customer to a group by moving the group ID from the left field to the right, using the buttons between the fields.
The groups are created in the Customer Group Detail screen. If you want to add more than one customer to the same group, you can do it in Customer Group Detail.
The Web User tab lists the users that can access information concerning this customer via a Web browser. It is only possible to view Web Users belonging to the sites that the current user is privileged to see.
User ID – the ID of the user
Site Id - The Id of the site that the user belongs to
Site Name - The name of the site that the user belongs to
To allow a new Web user access to PipeChain for this customer, click on the New Item button.
Select the user. Note that the users must first be defined in PipeChain (User Detail screen) and have a Profile that allows at least Guest Privilege in the WebCustomer module in the current Site before they can be selected in the drop-down menu.
Only used when using the WebShop Module.
The Documents tab is used for publish documents for the WebShop and will list all documents that is created.
There are tree types of documents that can be defined for a customer:
Welcome, Legal document and Announcement.
Welcome - a picture or text presented on the web page.
Legal documents - a link to a web page or a document.
Announcement - for Advertisement etc
To create a new document, click on new item button and a dialogbox will appear.
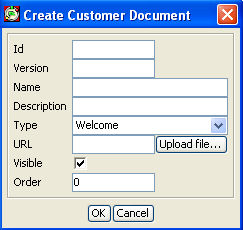
Id - a text field that must be unique for a document type
Version - a user defined version
Name - a text field presented on the web page
Description - a text field presented on the web page
Visible - uncheck to hide the document information
Order - an integer value that defines the presentation order of the documents on the web page
Columns - Name, Descr, URL, Order index are editable columns.
Only used when using the WebShop Module
This tab contains specific information about this customer. You can edit the text field when you create a TextAttribute and fill in any kind of information you want for this specified customer. You can choose between GeneralInformation and Description.

Here you can find all Partner Agreements for each Site for the Customer. The user may only see the Sites the user has privilege to.
If you right-click on a row in the list of outbound delivery agreements, you open a menu where you can choose the following commands:
Sort By - Opens a submenu where you can choose how to sort the list items.
View - Opens a submenu where you can choose how to manage the view/columns and show all columns.
Generate Delivery Suggestions – if you click this button, new delivery suggestions are created for all products and all sites for this customer.
Send Delivery Forecast - sends a delivery forecast to the customer with data for all sites with a partner agreement to this customer.
If you want to see more information about the partner agreement click here, and you will enter the Outbound Partner Agreement Detail screen.
Only used when using the WebShop Module
Defines which catalogues the customer are allowed to view on the web page.
If you double click you will enter the Calender Detail screen.
For connecting a new catalogue click on new item button, and a dialogbox will appear.
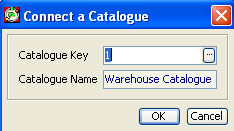
Catalogue Key - Define a catalogue to publish. Catalogue are defined in Catalogue Detail screen. See more information about how to define a catalogue in Catalogue Detail.
Buttons
Generate Delivery Suggestions – if you click this button, new delivery suggestions are created for all agreements and all sites that this customer has partner agreements with.
Send Delivery Forecast - sends a delivery forecast to the customer with data for each sites that this customer has partner agreements with.
Links
Partner Agreement. If there is a partner agreement for this customer you go to outbound partner agreement detail screen by clicking the link.
If there is no partner agreement there will be no link and the text is 'There is no partner agreement for this customer'.
Copyright © PipeChain Group AB. All rights reserved.